106: Customizing a WordPress Theme

Awesome job! You now have that theme installed and your website is starting to take shape. So what’s next? Now we will learn how to customize a WordPress Theme.
Customizing a WordPress Theme
 All WordPress themes that are installed have the ability to make modifications to them. In the WordPress dashboard sidebar locate “Appearance” and select “Customize.
The Customize Side Bar
Once you get into “customize” the left side bar will change and display your options of how you can customize the Theme. Each Theme might have additional or slightly different options. For this example we will cover the “Firmness” theme.
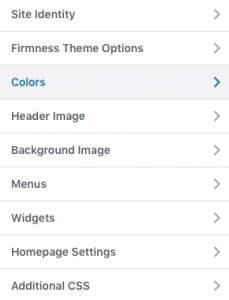
- Site Identity – This is where you can change the “Site Title”, as by default your website might show the title as the name of the Theme. If the theme has an option to add a custom logo for the website, adding that logo would also be located in this section.
- Theme Options – In this location, you might have the option to change you main color scheme, size of logo, font, layout and other options.
- Colors – Most Themes have a “Colors” option where you can change the background color.
- Header Image – If a particular WordPress theme has this option, you can add an image in the header where your site logo is placed.
- Background Image – Instead of a plain color for the background, some themes may have this option to include an image instead.
- Menus – Almost all WordPress themes will have this option. This is were you can add a menu (or shortcut) to some of your pages or topics.
- Widgets – If a theme is split into columns, there might be an option to adjust what is displayed on the sidebar or other header and footer sections.
- Homepage Settings – Most WordPress themes do have the ability to adjust what is displayed on the homepage. These options are typically a static homepage, meaning it doesn’t change unless you edit it. It may also provide the option to show your latest posts.
- Additional CSS – Most themes also have this option. If there is additional CSS that is required for your website to look correctly, this can be implemented here.
If you have selected one of these options to go back to the list of other options on the top of the side bar there will be a back arrow to select. After you have made changes you will want to make sure you save or select one of the other options.
Publish, Save Draft, Schedule
![]()
If you made any changes to the theme, there will be a “Publish” button at the top. Click this button to save those changes and have the updates go live. There is also a gear to the right of the “Publish” button. This will show additional options when you make changes.
Publish – 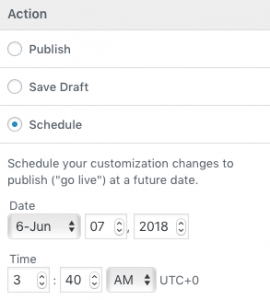 This allows you to instantly publish the changes that you made when you customized your WordPress Theme.
Save Draft – The save draft option will allow you to create a draft of the changes you made. After you save your draft in this options menu there will be a link that can be copied and shared to others to preview those changes before publishing them.
Schedule – Schedule a “go live date”. This allows a date to be set when these changes are put into place automatically.





It’s an awesome paragraph in favor of all the internet visitors; they will get benefit from it I am sure.
Great post!